Showing posts with label photoshop. Show all posts

Tuesday, August 23, 2011

Quick Tip: Minimizing Time in Post


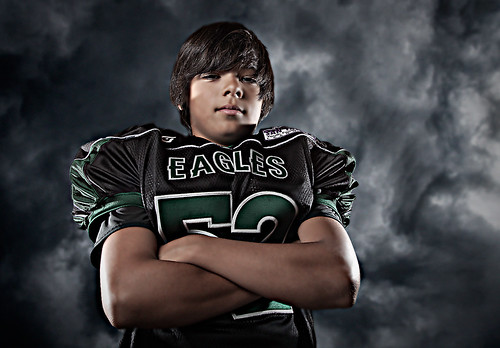
So here's a little situation I found myself in after a shoot at the local high school - all my headshots had visible wrinkles and seams in the background. Looking at the LCD on the back of my camera, I thought I had the background far enough away from the main to be properly underexposed, but after pulling up the images at home I saw that this wasn't the case. They were pretty bad, in the original image to the left, you can see wrinkles in the background and the edge is visible on the left side of the image as well as a seam under the subjects arm.


No biggy right? just clone it out? Well not, if I want to make more than minimum wage on this job. I had to think smart and come up with a way that I could quickly correct the days shoot in the minimum amount of time. The technique I found worked quite well and, more importantly it was fast. Round trip from Lightroom to Photoshop and back was less than 2 minutes - I think the results (right) were believable and I know It would have took me at least 4 times as long if I were to try and clone or paint my way out of this mess. While the main take away from this job could have been 'get it right in camera' I think it really stressed the importance of taking a second look at how you approach a problem in photoshop and consider alternative solutions rather than jump to the first technique you know, cause it could save you a whole bunch of time.

I put a little screencast together showing the technique I used and while the video compression really makes it tough to see the defects in the shadows, you can still get the gist of what I'm doing...

Friday, June 4, 2010

How to do a Backflip


Backflip, originally uploaded by photogeek21.

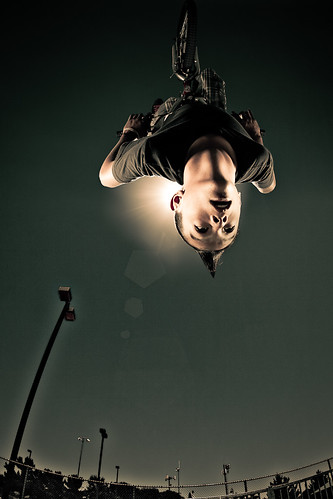
As much as I think my son is awesome at everything he does, he can't do a backflip on his bike - but that's not going to stop me from making an over-the-top portrait of him doing one. With some imagination, careful planning and two scoops of Photoshop thrown in for good measure, almost anyone can look like an 'X'games gold medal winner. So here's my deconstruction of the shot.


First, I started with a visit to the local skate park to get some shots I could use for the background.
15mm fisheye used for the shot, I stood in the same position I would if he were actually doing a backflip over my head. the 180 degree coverage of the lens gets the ramp and the late afternoon sun in the same frame.


Next, for the second shot of the composite, we strapped his bike down in the garage so that he could do all the moves he wanted and not have to worry about falling.
For lighting I used two photogenic 600s to 'sandwich' him in light ( I like the shadow it forms down his neck) and placed one 580exII at full power right behind him to act as the Sun that was captured at the park.
Using the same lens, I place him in roughly area of the frame I want him in the final shot so that the fisheye distortion will match in the final composite, and since he's on the ground that meant I had to have the camera in the air over him - thus the ladder.


With both the shots complete, I pulled the background shot into Photoshop. Since the sun was a little too high for my liking, I cloned it out.


Putting Ryan on another layer, I did some masking to get him out of the garage. I used the trial version of CS5 for this because of the really great edge detection demos I saw all over the web but it turns out they aren't as magical as some of the demos made it out to be - so this was still pretty tedious.


Turn both layers on, and BAM, kid floating in the air.


Throw the Sun back in there -- I really liked this behind the ear placement which would be hell to try and get in a real-life shot, but hey, I was going for 'over-the-top' for this shot.


Draw in a couple polygons on a new layer in screen mode for some artificial lens flare and run a high pass filter on the playground to give it a little HDR glow effect....

Finally, I brought it back into Lightroom for final cropping and toning which I think is a little easier to do in.


I really liked the way this one came out, it's rare for me to have the final image come out so close to what I envisioned in my pre-production sketches. What's funny is I was sorta in a slump about what to shoot lately, but the idea for this whole shoot was sparked by, of all things, my son wanting to get a mohawk for the last day of school. Maybe I go see if my youngest will shave his head for some inspiration....


Sunday, February 21, 2010

Step away from the delete key...

Was doing a shoot this afternoon experimenting with fill flash and when I was back at the computer culling the images I came across this one were the flash didn't fire leaving the subject under exposed. Usually I'd hit the old 'x' on lightroom to mark for deletion but I really liked the lines created by the headband. When I started to play with some levels, I got struck with some inspiration (or copycatitus) and pulled the image into photoshop for some channel work, masking and....

bam! instant poster. Moral of the story is it doesn't always have to be a great photograph to be a keeper - with a little creativity you can save those bits from the delete key...

Sunday, October 18, 2009

Great Site for laughs

While I'm always looking for sites to learn from and try new things in Photoshop or lightroom, I stumbled across this one that is going to be a regular visit for me - learn what NOT to do in photoshop. Hilarious - http://photoshopdisasters.blogspot.com

Saturday, September 12, 2009

Tough guy

Tough guy, originally uploaded by photogeek21.

Combined a little 'Strobist' technique and some heavy PS work Dave Hill Style to come up with my 'Tough Guy' shot of Ryan. Thinking of offering these style portraits at 10frames. I know the DH look is way over done in the photo world but I think it could still be a fresh look for youth sports portraits - at least around here, I haven't seen it much.

And in case you're wondering about the pre production version:


Friday, September 19, 2008

CSLR Challenge 128 - A knock out!


My entry 'Lights Outs' got the top vote in CSLR Challenge 128. I was very surprised since it was up against some very good entries. Now normally this image would have been part of my effort in getting the TaW series back up since it took a quite a bit to get my flabby, boney 40year old body to look like a boxer but I'm afraid the 'before' pictures are just too embarasing! So just know there was liberal use of the Liquify tool....

Thursday, February 14, 2008

TaW: #6 Correcting Blooming in CS3

Here's one I learned from Antonie_K on the Canon SLR Group on Flickr.

Here's a shot with the worst case of blooming I've ever taken. Blooming is basically a problem only found in digital photography and occurs when very bright areas are adjacent to dark ones I has to do with the way the image sensor elements get 'overloaded' with too much light and basically 'bleed' onto adjacent elements. If the situation is right it can happen on almost any digital camera. This shot was taken with the Canon 85 1.2L on an MkII so it's definately not a lens quality issue.

Anyway, to rid ourselves of this nasty purple mess - Open the image in CS3 and apply a HSL layer to the image, change its mode from Master to Blue, using the color picker tool select the offending color (magenta in this case) then turn down the saturation to taste (about -80 worked for this image). Thats it! No muss, no fuss. I imagine that if there was a lot of Magenta color in other areas of the image, that this technique could effect them but it would be nothing a little Layer Mask couldn't fix.

Better description of CA and Blooming can be found here.

Saturday, January 19, 2008

Taw:#5 - '300' Effect

Well after making the composite in TaW#4, I thought there just wasn't enough punch in it. So I applied the '300' look (from the movie 300) that I learned over on Matt Kloskowski's blog.
I did end up pumping up the blacks a bit and using the recovery slider to bring back some of the highlights - and of course I made one last stop to photoshop for some strong vignetting and burning in the shadows deeper.
Here are the resluts and my entry to the CSLR Challenge:


Friday, January 18, 2008

TaW:#4 - Composite

This week's Taw is a composite, I know everybody does corny composites of themselves and it's one of the first thing a noob tries in photoshop. Well I've never done one before and I was working on an image for this week's CSLR challenge which was a 'Free Study', So I thought I'd give it a try.
Here are the beginning images:


I thought to make the composite more interesting, I'd make Matthew interact with 'himself' in the photo. I drew a picture of what I wanted in the final shot and had Aly fill in the interacting positions so that mathew would have something to grab or a shirt to pull etc. She would be masked out in the final image.
CS3 has a cool new function that makes compositing a breeze now - 'photomerge' which automatically loads each image on a new layer then anaylzes each image and perfectly aligns them with one another. I did use a tripod so the alignment was already done but just the automation of putting each image on a separate layer and putting a mask on each layer is a big time saver.
After that it's just a matter of using the mask of each layer to reveal what you want to show on the final image - so here's the final composite:
I used my big studio strobes bounced off the back wall to create ALOT of diffused lighting but more importantly to have even lighting across the whole area - Lately I've been taking the 'Strobist' approach and using my 580exII but this called for a bit more power.

Thursday, December 6, 2007

Technique a week (TaW): #1 Soft Focus.

Here's one of learned from Chris Orweg, a Photoshop guru. It's a way to simulate the classic soft focus effect typically done through filters or special lenses in the past. It's pretty simple:
  1. duplicate your main image layer
  2. apply a Gaussian blur
  3. the use either a 'lighten' or 'darken' blend mode to the layer
  4. This will typically be way to harsh an effect so adjust opacity to taste.
This example I used the 'Lighten' Blend mode
Origninal Image (Click to Enlarge)

After (Click to Enlarge)

The effect should be suttle I may have applied a little too much in this photo - notice the soft focus on the highlights of Aly's hair and the flowers in the background. (tough to see on the thumbnail above, click to see a higher rez version where the effect is more apparent) I like it, I've learned it, I'll promise not to abuse it!

Technique a week.

This year I got a subscription to Lynda.com which, for those of you that don't know is a online video training site. My intention was to learn as much as I could about coding 10framesasecond.com. They have a lot of video training courses on webdesign but also photoshop and all things adobe - I started to plunge into there large library of courses. But it didn't take much time for the material to go in one ear and out the other. As it is I don't use this stuff everyday so how am I going to remember it? I'd often want to do something weeks after learning only to find out I'd forgotten all the steps.
So to put an end to all that forgetting and to hopefully ingrain anything I've learned into my thick skull, I've decided to do 'a technique a week' where I take technique I've learned - no matter how small and apply it to one of my images and post them here. Just like the CSLR challenge, this will force me to apply new concepts and to my photography and hopefully as I continue to practice these techniques, they'll become part of my workflow and hopefully become the inspiration for the creation of new techniques all my own and maybe even one day help to develop a signature style of my own.

Watch for the posts I hope I can keep it up for at least a year....

Thursday, May 17, 2007

CS3 Install what a nightmare!

$1500 in CS3 Web Premium software and it crashes on install! Started researching on the web and found this to be a common thing... Yes, I tried installing as an Administrator. Yes, I tried running MSCONFIG and selective startups, regedits, etc. Still no success. For a company like Adobe to ask this much money for an app and have it's installer be such a piece of crap is just plain inexcusable. So I'm down to my last resort - a fresh install of Win XP Pro. It appears to have worked, So now I can spend the next several days installing all the drivers, other apps and patches that were working just fine before I bought CS3...Thanks Adobe