Thursday, December 23, 2010

What's with me and keyboards?


It seems that all my android posts are keyboard related, from my FITALY keyboard dev project to Swype beta to Palm's Graffiti, and the improved Froyo stock offering. So with the latest release of gingerbread here I am playing with a new keyboard again. 

Up to now I've been using the latest Swype beta that fixed the gripes I had with its initial release. The biggest improvements in the latest swype were the double tap word correction and the addition of the voice command key which I use daily.

With Google's latest Android release,  Gingerbread, they took another stab at improving the keyboard.  So how'd they do?  Well the layout and spacing is much improved, it actually loose like a ripoff of the iphone's keyboard, which is a good thing as I still think it's one of the best on screen keyboards out there. Where the Gingerbread keyboard excels is in it's word prediction and with my big thumbs it's important for my keyboard to make sense of my many typos. But so far it doesn't seem any better than the Froyo keyboard, in fact there are some things that worked better before. For instance, when you hit the spacebar, the keyboard suggests common punctuation which it will place approximately right behind the word you just typed but it seems like this doesn 't work for the apostrophe which it places after the space. (See what happened to the word "doesn't") so still not perfect here.

So is it back to Swype for me? Maybe, but that is What makes Android great, you can change it to make it perfect for you and until I find that perfect, mind-reading keyboard, you can bet I’ll be doing just that. 

Thursday, November 25, 2010

Pocket Wizard Flex TT5 Lesson Learned: 001

Flex TT5 and the Canon 550ex


While this flash is supposed to work better (at longer ranges) with the Flex TT5 compared to the new 580exII. I found it to be quite a bit more finicky than the 580exIIs. At least with my flash, the Flex can lock up the flash so bad, it stops functioning all together even pressing the pilot button won't fire the flash. The only way to get it to work again is to remove the batteries from the flash. I have a theory that it may be due to interruption in communication between the flex and the flash. As the lock up condition is pretty consistent if I don't follow the specific power sequence as follows:

  • Turn on the camera mounted TT5

  • Turn on the remote TT5

  • Turn on the camera

  • Turn on the flash


This sequence (which is in the owner's manual - go figure RTFM) seems to produce consistent results with the 550ex. My 580exIIs don't seem to care how I turn of the equipment.

My Pocket Wizard Saga Continues...


Aly at sunset, originally uploaded by photogeek21.

Well I've mentioned that I picked up a set of PW Flex TT5 triggers before and now that I've had a couple weeks with them and done about 5 shoots my opinion is quickly solidifying, unfortunately it's not very positive.
Fist off, while the build quality is good, the Flex units do not appear to be very robust in design compared to the PWIIs I've used. In particular the antenna design appears to be quite fragile, I know I'm gonna rip one completely off someday, in fact I've already bent one after just my second location shoot with them.
My biggest gripe though is their functionality - They are just not reliable. I had high hopes for the units based the reputation of the PWIIs I've used in the past which were rock solid. I knew there were issues with the range of the units when used with the 580exII that I use but I would still expect them to work reliably at closer range. Well that just hasn't been the case - No matter what configuration I've used, ETTL, Manual, with or without the AC3 controller or which flash 580exII, 550 ex, or even my Photogenic 600W studio strobes - These things just won't fire 100% of the time. Of the 5 shoots I've done since getting these, only one has been done without a misfire - the other 4 had between 10 and 40% of the shots where the strobes didn't trigger. It's quite embarrassing to be fighting with your gear on a gig.

I love the idea of using TTL remotely outdoors at range, In fact, when they're working, they're awesome - so much so that I kept these past the 30 day return policy with the hopes that PocketWizard will figure out how to fix these problems. And to that effect the have been publishing regular firmware updates (which was another reason for me choosing the PWs)

So I'm sure to be posting my woes and wins with this things from time time here - I'm hoping for the best.

Monday, November 22, 2010

Focal Length and compression

On a recent location shoot of some family portraits, I played with varying focal length to control the background of the image. Increasing focal length compresses the apparent distance between subject and background, this I knew, but never before had I actually studied the effect in a single shoot.
In the shots I varied the distance between camera and subject according to focal length to keep the size of the subject in image constant. You can see how different the feel of each of the images below are. You can use this technique to control how dominant an object or landmark is in the background - or even compress it further with longer focal lengths to push it into abstraction.

Image 1

Focal Length =40mm Camera to subject distance=15ft

Image 2
Focal Length =150mm Camera to subject distance=75ft

Sunday, November 21, 2010

Google skymap as a phototool


Google's recent update to their Android app, Skymap, includes a new 'time-machine' function which allows you to see the constellations at any point in time. I must admit I wondered why you'd ever need to do something like this. Well, this week when I was scouting out a location for an upcoming family portrait session that was planned for sunrise it hit me. While there are multiple apps that will tell you when the sun will rise, my favorite being Sundroid, but they don't tell you where it will rise. Here's where Google Skymap comes to the rescue. Just pull up the time machine, enter the date and time of your shoot and just like that you have a map of the sky for that day. Hold your phone to the horizon and see exactly where the Sun will rise. The location I was in was surrounded by hills so I could adjust the time and find out exactly when the Sun would crest the hill and fill my background with glorious golden light. With this knowledge I was able to pick my exact shoot location that would place the sun right were I wanted it, I also knew how much time I had to work setup and the talent before the light would come. It all made for a well planned shoot with no surprises - Thanks Gooqle.

Thursday, November 11, 2010

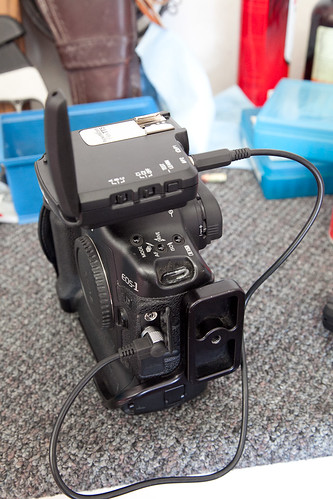
DIY Pocket wizard Pre-trigger cable - Saved $70


DYI CM-N3-ACC, originally uploaded by photogeek21.

Been playing with a set of Flex TT5's and wanted to explore using the PW to remotely trigger the shutter but when I went to buy one, I found the $95 price tag just to much to swallow.
Well, internet to the rescue, I found a great writeup on the Canon NC3 connector which my 5dmkII uses for remote shutter here.
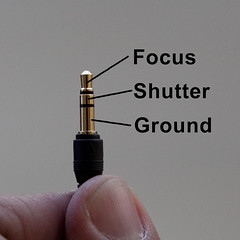
All I needed to do is figure out the right pins for the 1/8" stereo plug on the PW side. A little time with PW and an ohm meter I eventually figured it out.
The donor for the NC3 connector was a cheap Ebay remote trigger. A trip to radio shack and a couple bucks got me the 1/8" plug. All in, about $20. Works like a charm. Below is the pinout for anyone that feels handy with a soldering iron or if not, I did eventually find them for about $26 at Flashzebra.com.


1/8" Stereo plug pinout for Flex TT5

Tuesday, November 2, 2010

Wireless TTL


_MG_9569, originally uploaded by photogeek21.

So I gave into my gadget weakness again and broke down and bought a set of Pocket Wizard Flex TT5s to wirelessly sync my speedlights in E-TTL mode.
This image was taken at 10 pm on my front porch the TTL let me play with my ISO - I needed to push it to 6400 inorder to get the landscape lights to show up in the exposure - the TTL automatically adjusted my flash output as I upped the ISO to prevent Aly from being over exposed. Sorta nice to work this way especially when the speedlight is mounted somewhere out of reach.
Now, I did hear how unreliable these TT5s were before I bought them and I'm sadden to say all the reports were true, I was getting about 25% no fires - even with my 550 ex which is NOT suppose to have the RF noise problem my 580exIIs have. But the promise of HSS and Wireless ETTL is keeping me here hoping someone finds a solution....

Friday, October 22, 2010

Retro Camera

 Found an Interesting app for my Android Phone. I usually don't like heavily processed photos that are canned but this adds some dimension to the typical cell phone photo. It has several effects which are suppose to replicate several toy cameras I never really heard. I can't comment on how representative the final picture is to the camera it's supposed to be replicating but who cares as long as you like the effect and the border it creates. In typical mobile app fashion you can pay for the app or get an ad supported one for free.  

Posted via Android and Posterous.com (http://barryshaffer.posterous.com)

Sunday, October 3, 2010

Another reason for RAW


Morning's first light, originally uploaded by photogeek21.

Just found another plus for shooting raw. I recently upgraded to Lightroom 3 which has a couple new twists in it's raw processing engine one of my favorites recently has been it's noise reduction. The above image was shot at ISO1600 on my 1DmkII which left it quite noisy. I felt the noise distracted from the peaceful mood I was trying to set with the image and it was cast aside in my original culling. But after seeing what LR3 could do I pulled this image up and turned that noise into a silky smooth tones, added a nice under exposure gradient at the top of the image and now I have the image that sets the mood I was going for but couldn't execute back then. Nice. Software is always advancing and it's neat to take old images and breath new light into them.

Saturday, August 7, 2010

Scott Kelby World Wide Photowalk 2010


Ride like the wind, originally uploaded by photogeek21.

Weather in Arizona during the month of July isn't exactly what you want to be in while shooting photos outside. But for some reason I signed up again after taking a couple years off. This year I headed up to Cave Creek to shoot the sights around Frontier town. The old west motif was all over this quaint little tourist spot and I found it quite challenging to take a unique angle on the statues and wagon wheels that were all over the place. But I gave it a shot, and the weather cooperated as well. I wont say it was cool but we were fortunate enough to get a bit of cloud cover that morning which 'cooled' things off to just around 98 degrees, compared to the 112 degree weather I shot in on the last photowalk I did in tempe several years ago, it was heaven.
Once again, I had a great time and met some really great fellow photogs.

Sunday, July 18, 2010

Time to check my focus


Found a really good article on several techniques on setting the microfocus adjustment on my 5d.

 AF microadjustment for the 1Ds mark III, 1D Mk3, 5D Mk2, 7D 

Saturday, July 17, 2010

Nordic Components NC22 First Impression

Last November I picked up a certificate for an NC22 rifle off the prize table of the Area 2 Desert Classic. I didn't really know what it was but I thought it'd be fun for my Son to shoot since my real AR is still a bit big and heavy for him.
Well the rifle arrived last week and I was extremely pleased to find how well made this rifle is. It appears that Nordic components fits a custom upper, specifically designed and optimized for running 22lr rounds to a standard AR lower. The upper to lower fit was nice and tight without a bit of slop or rattle.
The rifle came with one BlackDog 10 round magazine. I fitted it with a spare CMore sight (that I also picked up off the prize table) and went to the range to sight it in.
While I didn't shoot any groups as with a CMore, I wasn't setting this up to be a target rifle. But what this rifle is is FUN. A well balance AR platform shooting .22lr rounds just doesn't recoil and makes double taps and rapid fire strings a blast to pull off.
I shot about 700 rounds of a mixture of Federal and Winchester 36gr. copper plated bulk ammo through it and it never skipped a beat.
Ryan and I shot it this week in a local tactical rife match that was half close range rapid fire targets and half long range work - I took fifth which I thought was pretty good considering I didn't know what I was doing and a 12MOA red dot CMORE isn't the right tool to be pulling off long range work.
The one down side of the rifle is that the trigger leaves MUCH to be desired, but that could just be that I haven't shot a stock trigger in years. It does appear that they're just standard GI parts so I may have a go with some polishing compound and some spring cutting to see what happens.
So my bottom line on the Nordic Components NC22 Rifle? One hellova fun gun that's built right.


Android goes old skool...


It's been almost 12 years since I used Graffiti on my Palm X, but when I saw it land in the Android marketplace, I loaded up and all the gestures came back to me. It's very true to the original graffiti but it seems a bit faster and more accurate than I remember.
It is quite a bit more motion than just typing on a standard keyboard or using something like SWYPE but I find it much more accurate. I recently gave up on SWYPE and went back to the standard Android keyboard which I found much improved in the latest Froyo update. One of thing that I find great about the new Android keyboard is that its predictive text is excellent I usually only have to type a few letters and the correct work pops up for selection so I usually find myself only needing 3 or 4 characters per word which really lessens the strokes. SWYPE requires that you trace the entire word out before it can predict the your intent (and it gets VERY aggravating when its wrong). Graffiti doesn't have any predictive text so you don't get any annoying corrections but the downside is you have to type the entire word. I think if they can add predictive text as good as the stock keyboard - this will be my new full time keyboard.

Friday, June 4, 2010

How to do a Backflip


Backflip, originally uploaded by photogeek21.

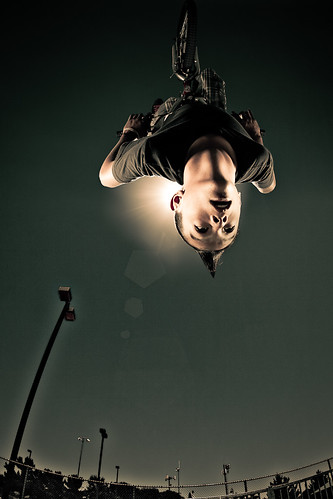
As much as I think my son is awesome at everything he does, he can't do a backflip on his bike - but that's not going to stop me from making an over-the-top portrait of him doing one. With some imagination, careful planning and two scoops of Photoshop thrown in for good measure, almost anyone can look like an 'X'games gold medal winner. So here's my deconstruction of the shot.


First, I started with a visit to the local skate park to get some shots I could use for the background.
15mm fisheye used for the shot, I stood in the same position I would if he were actually doing a backflip over my head. the 180 degree coverage of the lens gets the ramp and the late afternoon sun in the same frame.


Next, for the second shot of the composite, we strapped his bike down in the garage so that he could do all the moves he wanted and not have to worry about falling.
For lighting I used two photogenic 600s to 'sandwich' him in light ( I like the shadow it forms down his neck) and placed one 580exII at full power right behind him to act as the Sun that was captured at the park.
Using the same lens, I place him in roughly area of the frame I want him in the final shot so that the fisheye distortion will match in the final composite, and since he's on the ground that meant I had to have the camera in the air over him - thus the ladder.


With both the shots complete, I pulled the background shot into Photoshop. Since the sun was a little too high for my liking, I cloned it out.


Putting Ryan on another layer, I did some masking to get him out of the garage. I used the trial version of CS5 for this because of the really great edge detection demos I saw all over the web but it turns out they aren't as magical as some of the demos made it out to be - so this was still pretty tedious.


Turn both layers on, and BAM, kid floating in the air.


Throw the Sun back in there -- I really liked this behind the ear placement which would be hell to try and get in a real-life shot, but hey, I was going for 'over-the-top' for this shot.


Draw in a couple polygons on a new layer in screen mode for some artificial lens flare and run a high pass filter on the playground to give it a little HDR glow effect....

Finally, I brought it back into Lightroom for final cropping and toning which I think is a little easier to do in.


I really liked the way this one came out, it's rare for me to have the final image come out so close to what I envisioned in my pre-production sketches. What's funny is I was sorta in a slump about what to shoot lately, but the idea for this whole shoot was sparked by, of all things, my son wanting to get a mohawk for the last day of school. Maybe I go see if my youngest will shave his head for some inspiration....


Wednesday, June 2, 2010

Using a Reflector


In the weeds, originally uploaded by photogeek21.

Every photog knows the about the 'golden hour' for the gorgeous quality of light that is produced just after sunrise and just before sunset each day, but what most don't do (including me 'til now) is get enough fill on the subject to balance out the extreme side lighting that a low sun will create. I've usually been using a flash for this work but that can cause some variations in color temperature across the frame unless you gel your flash. A reflector is a easy (and cheap) way of doing roughly the same thing.
Above is a picture of Ryan where I placed the 5pm sun behind him to act as a hair light, then used the reflector to bounce the sun and create the main light for his face. I placed him in the edge of a shadow created by a near by house to throw the background tone into a lower exposure value and let his face stand out against it but kept the foreground lit to keep the interesting shape of the weeds. And, my favorite part of a portrait, catch lights in the eyes. With the sun behind him the reflector is the only way short of a fill flash to get those eyes to sparkle.
Contrast that with the following with out the reflector.

While I still get a nice side light, but the catch lights are gone, his face is flat without any shadows, his face falls into the same exposure levels as the background and even if I bump the exposure a bit, the side light would probably clip and his face would still blend with the background.

I'm pretty convinced that a reflector is a 'must have' item for any portrait photog - they don't break the bank either, but if you're really cheap like I am you can use a Car Sunshade, I got mine at target for $5.99 and its even silver on one side and gold on the other - almost like it was designed to double as a photo reflector!

Sunday, May 30, 2010

85 F1.2 Love this Lens

Well I seem to be posting more about my Android diversions than photography lately, so here's a little return to my main subject, shooting the 85 1.2 - I passed on the 70 - 200 2.8 last year in favor of the 85 prime. I wondered if it was the right decision, but after shooting with it for a while, I'm glad I chose it, the images taken with this lens are very unique and you can usually spot them fairly quickly.


Shooting with this lens takes a lot of patience (because it's a slow focusing lens) and even more practice. Shooting wide open produces EXTREMELY shallow depth of field - like in millimeters! Look at the sample above, 3/4 pose you would usually think one eye in focus and the other soft, but here you can see the the DOF is so shallow the focus softens with the span of a single eye - probably less than an eighth of an inch. Shooting this shallow means I need to change the way I shoot - No more using the center focus sensor, locking focus, then recomposing - that slight change in position will throw the it out of focus. You really need to use the focus point selection function here and use the sensor that falls on the area you want in focus - this does put some boundaries on you composition. My usual technique of prefocusing and waiting for the right expression doesn't work either, lock too early and your subjects subtle movements can throw you out of focus again.
But even with all this hassle, I just can't get over the unique nature of the images produced, and in my opinion, well worth the work.

Monday, May 24, 2010

Froyo up and running on my nexus one


Yea, Google's next version of their android operating system, Froyo, wasn't supposed to be out for a couple of weeks. But it does appear that they pushed it out to their nexus one dev phones last week so of course its out there on the web... and now on my phone. :-).
The official Google file only works for stock, non-rooted, T-mobile Nexus ones, but thanks to Paul's hard work over at MoDaCo, we now have a way for all of us that rooted our N1s to get our 'Frozen Dessert' - Thanks Paul!
So What Do I Think?
Well, I was running Cyanogen's latest rom with Pershoot's UV/OC kernel - so how's Froyo Compare?
  • Dalvik VM with JIT compiler: I did not notice any performance gains in my apps (although my rooted setup was much more responsive than stock)
  • New Browser rocks! Much improvement here. Notice Google reader and docs to render MUCH faster - definate improvement.
  • Tethering - Both USB and WiFi tethering are enabled on this build, Awesome! Love the support in the OS, this was the biggest reason for me the root 2.1 on my N1, now there's no need. The NexusOne is still Google's favorite Son and they're showing it lots of love, here. I doubt any updates pushed to the other Android phones by the carriers will have this option.
  • The new camera is nicer and more responsive but I miss the desire camera I had on before, touch to focus and face detection should have made it's way into Google's native camera...
  • My problems with loosing WiFi during sleep seemed to have all but disappeared.
  • So far I'm loving all the little enhancements as well (like next and previous buttons in GMAIL and the permanent phone and browser buttons on the home screen.

I'll need a little more time with it to see how battery life is but overall, I think it's worth keeping over the custom roms I was running. Although, I can't wait to see what the ROM cookers have instore for 2.2....

Saturday, May 8, 2010

Rooted my Nexus One


I'll have to admit, I've put off rooting my N1 for lack of a good reason and the possibility of ending up with a $500 brick.
But after reading all the walk thrus on theclockr.com I got the confidence up to finally do it with the sole intent to run the Andriod-WiFi-Tether app.
The one thing that was lacking was detailed instructions on rooting under Linux, but hobo14 saved me there with his post which provided the critical initial usb settings I needed to have the computer see the phone during fastboot (seems that the Vendor id changes when the phone is in fastboot)

$ sudo gedit /etc/udev/rules.d/51-android.rules

- Save these two lines into the file:
Code:

SUBSYSTEM=="usb", SYSFS{idVendor}=="18d1", MODE="0666"
SUBSYSTEM=="usb", SYSFS{idVendor}=="0bb4", MODE="0666"

$ sudo chmod a+rx /etc/udev/rules.d/51-android.rules

After that, all went well. I used the latest Cyanogen mod, as it was noted to be the most stable.

So how's it work?
  • The phone is really snappy but that could be cause I wiped the 30 or so apps off the phone but I'd be nice if it stays that way after I load it back up.
  • Wifi tether works great.
  • So far my Wifi Sleep issues have gone away - but it's still too early to tell.
  • A bit more bling on the phone (multi color trackball, new wallpaper, and ringtones)
  • Also seems that I have 150M free now verses less than 90 with the stock roms.
I'll revisit this post as I find out more.

Friday, April 23, 2010

Brad Presents

Enjoyed a great post over at Scott Kelby's blog today that relates points made in the reality show Kitchen Nightmares to your photography business. While it provided a bit of humor the points are well made and I found the article timely as I have been contemplating where I want to go with my photography...
Here's a link to the full post.
Brad Presents “Lessons From Kitchen Nightmares”

Posted using ShareThis

Monday, April 19, 2010

Might as well post everything....

There's a lot of times a shoot an event for my own enjoyment without anybody acutally hiring me to photograph, which was the case a couple weeks ago when I shot the 3 gun nation shootoff. In cases like this I usually just post the shots to flickr and put a slide show of the coverage on my site with no intentions of selling any images. But in this case, my images caught the eye of one of the competitors (who also happens to be a photographer)and he contacted me about the photos in my gallery, said he really admired several of them and I ended up making a sale. Now he could have just downloaded the images off of flickr, but I guess the fact that he was also a photographer kept him from doing that or he was just an honest guy. Anyway, image protection isn't what prompted me to write this post, sales is. The fact is I should be posting all my favorite images from these personal events in my sales gallery - who knows how many sales I've lost by not giving viewers the opportunity to purchase, most won't be inclined to take the initiative to inquire about a purchase like my fellow photographer/shooter. While I always like it when people get enjoyment from my images even when they don't buy, that's no reason to not offer all my images for sale. Besides, it's a business and businesses are created to make money... Sometimes I forget that.

Friday, April 16, 2010

Protecting Images with Lightroom 3 Video


Tapia Shoot 1, originally uploaded by 10framesasecond.com.

One of the things I found out using the new Lightroom 3 beta 2 was the new option of exporting a slideshow to video. Previously you could output to a pdf file which is okay for sending clients but probably not what you want to imbed in a site or a blog.
I used the slideshow module for a recent shoot as a way to show my clients the proofs from the shoot and exported to video to make a self contained file that I could host on flickr and embed on my site quite easily. The encoding options up to 1080P High Definition are avaliable but I kepted mine to 720P HD to keep file size reasonable.
A nice side benefit of the video format is that you can post a number of images as a single file that isn't too easily printed which those that are worried about the stealing of images may find attractive.

Monday, April 5, 2010

Remote Location Shooting - several firsts (for me).

Had my first location shoot with a paying client this past weekend. When they came to me and asked me to shoot their family portrait, they didn't have anything special in mind but said they trusted me and would let me decide - no pressure right?
Well, I love the outdoors and decided to do a outdoor shoot in the middle of the Arizona desert using the unique profile of the Superstition Mountains as the back drop.

Even though I was planning a 'golden-hour' shoot I knew we would get out there earlier and would shoot individuals in harsher light, I need fill light and my Speedlites weren't going to have the muscle to fight the bright Arizona Sun, So the 600ws studio strobes would be the key to this shoot and they would be powered by a newly built DIY pure-sine pack on loan from a Friend and my 725VA UPS as backup. I used a polarizing filter to cut through the haze and deepen the blue in the sky and it's 2 stop density also help to get the shutter speeds down to the 1/200 I needed for the strobe sync (I packed an additional 2 stop ND filter just in case though). I rented some pocket wizards to trigger the strobes - no way was I going to be at the mercy of my Cacuts V2s and their less than reliable performance on this shoot.

I used a second body for my 85 F1.2 lens so that I wouldn't have to change lenses and risk getting dessert dust on my sensor. I used this lens to close to wide open exploit it's wonderful boken, this put the shutter speeds way up in the 1/4000 + range while I could have used my 580exII for fill, I instead used a diffuser to soften the light (another first for me)and when I got it right, the light is magical. To really get the best effect you really need to get the diffuser as close to the subject as possible.

Lastly, the one thing that made this shoot go off so smoothly besides the prep was my assistant, Alma, who also happens to me my wife. She helped me by modeling while we were out scouting locations, manned the GPS to find our spot later, but what was invaluable was her people handling skills, she built a repore with the little ones while I was shooting individuals with other family members and made them comfortable when I was shooting them. I know I wouldn't have been able to make a 3 year old act natural chasing her around with a 52" diffuser and sticking a big lens in her face, but with Alma, it was just playtime...

The only big mistake I made on this shoot was that I forgot to set my second camera back to RAW after shooting jpgs when I was cleaning it's sensor earlier that week. Not a total blunder as all the shots were nicely exposed and I didn't need any tweaking.

This was one of the smoothest sessions I've had in a long time, and had allot of fun shooting it. One last first, I used the slideshow module in the Lightroom 3 beta to make a quick video of proofs for client and was able to deliver that by the next day which really hit a home run with them.

So, a recap:
Strobes on location - Rock.
Pocket wizards - Rock harder must add to the shopping list.
Diffusers / Reflectors - Sweet, add to wish list.
Awesome Assistant - Never shoot again without one!

Sunday, March 14, 2010

Studio strobes on location


Well after the little test I did at home I figured I'd do a little field testing of my UPS powered Studio strobes. So I packed up the family for a portrait in the park. While I didn't get the shot I wanted, it wasn't due to the strobes or the power supply. Using a 45" shoot through umbrella, I was able to keep up with the sun at 3/4 power and below @ anywhere from 10 to 15 feet from the subject, I never ran out of juice on this rather quick session (50-60 shots).
What didn't work were my crappy Cactus II triggers - they failed to fire about 30% of the time and my camera was never more 6' from the strobe at any time. I'm getting real sick of these things - gonna have to buy me some REAL triggers when money isn't so tight.
The faulty triggers lead to a lot of frustration in the family portrait (see Matthew, my youngest) since I was taking each shot on a timer, I'd have to run around the pond for each shot. Needless to say, running over there and then having the trigger fail really sucked. (you can see me in the picture about to through my hands up because I thought the strobe didn't fire) One thing I am going to order right after I finish this post is a remote trigger for my camera, this self-timer approach is for the birds....

Running Studio Strobes on a UPS for Location Shooting

Well, before spending the $170 in parts for the DYI Vagabond posted on myJTP.com's youtube channel. I always wondered why I couldn't just use my computer's UPS. It's 725VA, self contained, built in charger, really cheap (<$100) why wouldn't this work? Well I got some time to do some testing and found out the following. Using my Photogenic 600ws monolights I was able to get 125 full power pops off of my fully charged UPS (battery in the UPS was about 2years old) til it cut power when the battery reached about 19% charge. Recharge time on the strobe was about 3.5 seconds, so not really as fast as pluging into a good 'ol AC outlet. Not really enough for a full shoot but I could do in a pinch. The battery in the unit is about 1/3 the size as the one in the Vagabond, so that explains why it didn't last that long.
So it worked but there is alot of chatter on the flickr groups about the need for a pure sine inverter to power strobes. I believe my strobes have a transformer rectified front end that charges the capacitor bank which is the worst ones to run off a approximate-sine inverter like my UPS - I didn't fry anything in the process, and nothing even got too hot in the process, but I think to be safe, I'll build the DYI kit with a pure sine.

FITALY for Andriod Code.

For those of you that have asked, and aren't totally won over by Swype (my personal favorite keyboard on Android), I've posted the xml file for the my version of the FITALY layout. You can use this to compile a version of the keyboard for your phone. Or if you wish, I've posted my apk here. It should work for Android 1.5 but I've only tested with the emulator and not on a real phone. Once installed you set it up like any other alternative keyboard in phone settings. You'll need to run the anysoft setup to choose the FITALY layout.
Again, just another reason to love the open-ness of Android in it's ability to be able to pull apps from non-market place sources.
Enjoy.

Tuesday, March 9, 2010

DYI Vagabond

Was planning on doing this for a long time, nice to see someone proved it out - and doesn't need as big a batter as I was going to use. Still want to see if a simple UPS would work as well. They can be had for cheap and have a built in charger. But this DYI has a nice look to it as well.

Monday, February 22, 2010

Fitaly Keyboard running on Nexus One

Well I couldn't wait til my next lunch hour to work on this, so when I got home I did a little search and found an open source project called softkeyboard which is a really nice soft keyboard with multi-language support and lots of great functionality including the predictive text function and user defined dictionary support I was looking for. Since it's quite a bit more complicated than Google's little sample keyboard it took me a bit to figure out how to get my FITALY layout integrated into it but I got it going in about an hour (while watching 24). Here it is running on my Nexus One:

Yea, I was pretty proud of my first hack of an Android app. But now that I got it on my phone how's it work? Well, to be honest, not as great as I thought it'd be. First, as you can see, the 6 row format takes quite a bit of screen real estate and the keys are already too small to 'thumbtype' like I wanted so making them any smaller is out. I'll give it a try for a week and see how I like it.

DYI - Fitaly Keyboard for Android

A little departure from photography in this post to get a little 'geeky'. I've had my Android Nexus One phone for about a month now and I'm still loving it. One thing that I had to get use to coming from the blackberry is the N1's virtual keyboard. I'd like to be able to type quick messages out one handed using just my thumb to peck at the keyboard but a QWERTY keyboard is not suited for this. Back in my Palm OS days, I used a keyboard layout that was designed for a stylus, and transfers well to one finger typing. The layout is called FITALY and is based on grouping the most common keys in the center of the layout and the least used at the edges with the intent of minimizing the distance your finger has to travel to type out a message.

In looking at the Android marketplace, I found all sorts of alternative keyboards but no FITALY. The original makers of fitaly for the palm still have a webpage but no signs of plans for porting it to Android - So I decided to see how tough it'd be to write my own. After all, Android is supposed to be and open platform and Google gives you all the tools you need to get started writing apps - so let see...

As it turns out, it was amazingly simple, Google even had an example of a virtual QWERTY keyboard in their SDK. The keyboard layout is defined by a simple XML file. So without any programming, I got fitaly running over a lunch break. Now it's pretty basic, but after seeing what's involved I think I'll adapt the layout to one of the more elaborate soft keyboards that are open source projects to take advantage of the predictive text and user dictionary functions they provide. Maybe done by next lunch break?

Anyway, this little exercise cemented my love for the Android OS - I think its going to take over the small device market over the next couple years.

Sunday, February 21, 2010

Step away from the delete key...

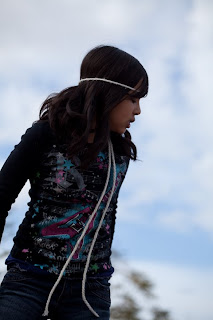
Was doing a shoot this afternoon experimenting with fill flash and when I was back at the computer culling the images I came across this one were the flash didn't fire leaving the subject under exposed. Usually I'd hit the old 'x' on lightroom to mark for deletion but I really liked the lines created by the headband. When I started to play with some levels, I got struck with some inspiration (or copycatitus) and pulled the image into photoshop for some channel work, masking and....

bam! instant poster. Moral of the story is it doesn't always have to be a great photograph to be a keeper - with a little creativity you can save those bits from the delete key...

Monday, February 15, 2010

My hiking rig


Here's my light weight rig I use while hiking. G9, super pod, and a ex580. Yes, the flash is grotesquely large, it does an excellent job fighting the Arizona sun. Using its high speed mode, I can still use fast shutter speeds and wider apertures with fill flash performance the built in can't touch.

I know I've knocked the G9 before but it's got its place. The rig is light weight and easy to carry - the folded tripod makes a good carry handle.

Sunday, January 24, 2010

The best camera in the world


To qoute Chase Jarvis, "the best camera in the world is the one you have with you..." and to continue from my previous post, the camera I have with me most often is the one on my new Nexus one. While it most certainly won't make me hang up my MkII, the 5megapixel camera ain't to shabby. The shot here was taken with the aid of a polarizing filter I just happened to have with me(really). While not used in this image, the android app, picsay pro, has all the post processing power you could ask for in a phone. Think I'll be doing a lot more shooting with this combo

Friday, January 15, 2010

Happy New Gear!!

My favorite new peice of gear for the new year is my new Phone. I know, it's not exactly photographic but I got a new Nexus One Android powered phone and it is one hot piece of gear. I'm sure I'll be using it in to support photographic assignments like geocacheing locatings of outdoor settings when I scout for places to shoot so it isn't totally out of place here.

The Nexus one is a nice piece of hardware, very solid in construction, elegant in design and feels very good in the hand - a far cry from the orignial Android phone, the G1. In fact both my wife and I agree it makes her iphone 3Gs look a bit long in the tooth. For me, coming from a Blackberry Curve it pure heaven.

The Highs:
The screen is absolutely gorgeous. The higher resolution really makes everything very crisp and readable. Again, compared to the Iphone, this screen is a winner.
If there is one area where the Iphone's screen is better, its color. I have noticed the color is off with over saturation of Red and orange making pictures of people look a like they got a little too much sun.
'Snapdragon' is an appropriate name for the 1GHz beast that powers this phone. and from a UI standpoint, I honestly can't feel a significant difference between it and the Iphone. But, I think it allows the Android OS to really shine in the amount of apps that can be running in the background. Now, I can feel the UI slow a bit when I get crazy and have too many running but I had no problems streaming a podcast over 3G while doing turn by turn navigation AND still had my usual host of Twitter and mail clients loaded.
Andriod 2.1 added voice to the basic keyboard allowing voice entry in practically any field you type. The recognition is pretty accurate - if you've used the google voice search on your phone, I think there the same. It's pretty useful for constructing SMS of entering short phrases. I haven't found that it can take longer passages like writing an email.
I mention Turn-by-Turn voice navigation and it's a pretty sweet implementation on the Nexus one. I think it finally puts true PND functionality in a phone and has killed my desire to get a stand-alone device. Nothing like it on the Iphone unless you want to spend $80.
When it comes to Apps on the Android, I think the Marketplace is well stocked with good versions of ever popular app out there - The Iphone wins when it comes to some niche applications and for the shear number of apps on their store. I look at it this way; what's the difference between 20,000 apps and 100,000 when I only use 10?

The Lows:
One gripe I have is with the use of the virtual keyboard. It's not that is hard to use, actually I like the keyboard itself, its the touch sensitive keys at the bottom of the phone that I unintentionally hit far too often. Seem my fat thumb hits 'home' when I'm wanting the spacebar - argh! that's agravating!
The only other thing I'd hesitate to call a Low is that T-mobile's 3G does seem slower than my wife's ATT 3G's. Her's is noticably faster (when she actually has a signal) But I think it's a wash since in our area I usually have a connection when she doesn't and again, compared to my Blackberry's EDGE connection, this thing smokes!
My final low is one that both the Iphone and the Nexus share and where my old blackberry kicks both their asses - GRMS(?). One of my buildings at work is a huge deadzone for cell coverage, but with my blackberry, once it lost the cell signal, it would automatically connect to the company's WiFi and keep the ability to make and recieve voice calls. Why the Iphone and Nexus can't do this, I have no Idea - but I think that was one if the best features of that blackberry and can't image a modern phone not having this ability.

Wednesday, January 13, 2010

Wit Whiz - for free


Wit Whiz, originally uploaded by photogeek21.

Ha! Here's a shot I took of my lunch while on travel in Philadelphia. No great work of art, just wanted to document my first REAL cheesesteak sandwich. Well, it was selected as one of the shots representing the restaurant, Jim's Steaks, in an online travel guide. No compensation, just attribution (as per my creative commons license).
I imagine Flickr has become such a resource for sites like this, heck once Geotagging of images becomes more prevalent their job is even easier.

I used to think giving away images cheapens the art, but lets face it, photography has changed forever, equipment is more accessible, people are taking more images, and good images at that. Those that complain about it need to put less effort into complaining and more into improving on their art to separate themselves from the pack and give one a reason to pay for their work.