
Weather in Arizona during the month of July isn't exactly what you want to be in while shooting photos outside. But for some reason I signed up again after taking a couple years off. This year I headed up to Cave Creek to shoot the sights around Frontier town. The old west motif was all over this quaint little tourist spot and I found it quite challenging to take a unique angle on the statues and wagon wheels that were all over the place. But I gave it a shot, and the weather cooperated as well. I wont say it was cool but we were fortunate enough to get a bit of cloud cover that morning which 'cooled' things off to just around 98 degrees, compared to the 112 degree weather I shot in on the last photowalk I did in tempe several years ago, it was heaven.
Once again, I had a great time and met some really great fellow photogs.
Saturday, August 7, 2010
Scott Kelby World Wide Photowalk 2010
Sunday, July 18, 2010
Time to check my focus
Found a really good article on several techniques on setting the microfocus adjustment on my 5d.
AF microadjustment for the 1Ds mark III, 1D Mk3, 5D Mk2, 7D
Saturday, July 17, 2010
Nordic Components NC22 First Impression


Android goes old skool...

Wednesday, June 23, 2010
Friday, June 4, 2010
How to do a Backflip
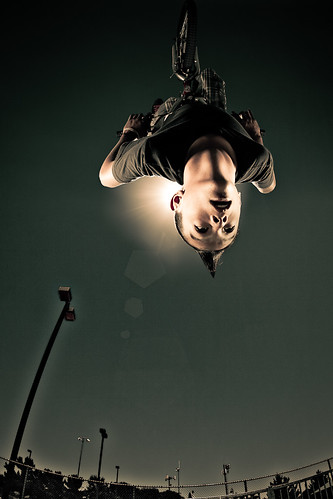
As much as I think my son is awesome at everything he does, he can't do a backflip on his bike - but that's not going to stop me from making an over-the-top portrait of him doing one. With some imagination, careful planning and two scoops of Photoshop thrown in for good measure, almost anyone can look like an 'X'games gold medal winner. So here's my deconstruction of the shot.
 | First, I started with a visit to the local skate park to get some shots I could use for the background. 15mm fisheye used for the shot, I stood in the same position I would if he were actually doing a backflip over my head. the 180 degree coverage of the lens gets the ramp and the late afternoon sun in the same frame. |
 | Next, for the second shot of the composite, we strapped his bike down in the garage so that he could do all the moves he wanted and not have to worry about falling. For lighting I used two photogenic 600s to 'sandwich' him in light ( I like the shadow it forms down his neck) and placed one 580exII at full power right behind him to act as the Sun that was captured at the park. Using the same lens, I place him in roughly area of the frame I want him in the final shot so that the fisheye distortion will match in the final composite, and since he's on the ground that meant I had to have the camera in the air over him - thus the ladder. |
 | With both the shots complete, I pulled the background shot into Photoshop. Since the sun was a little too high for my liking, I cloned it out. |
 | Putting Ryan on another layer, I did some masking to get him out of the garage. I used the trial version of CS5 for this because of the really great edge detection demos I saw all over the web but it turns out they aren't as magical as some of the demos made it out to be - so this was still pretty tedious. |
 | Turn both layers on, and BAM, kid floating in the air. |
| Throw the Sun back in there -- I really liked this behind the ear placement which would be hell to try and get in a real-life shot, but hey, I was going for 'over-the-top' for this shot. |

I really liked the way this one came out, it's rare for me to have the final image come out so close to what I envisioned in my pre-production sketches. What's funny is I was sorta in a slump about what to shoot lately, but the idea for this whole shoot was sparked by, of all things, my son wanting to get a mohawk for the last day of school. Maybe I go see if my youngest will shave his head for some inspiration....
Wednesday, June 2, 2010
Using a Reflector
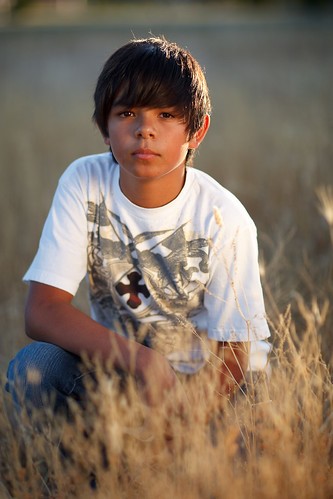
Every photog knows the about the 'golden hour' for the gorgeous quality of light that is produced just after sunrise and just before sunset each day, but what most don't do (including me 'til now) is get enough fill on the subject to balance out the extreme side lighting that a low sun will create. I've usually been using a flash for this work but that can cause some variations in color temperature across the frame unless you gel your flash. A reflector is a easy (and cheap) way of doing roughly the same thing.
Above is a picture of Ryan where I placed the 5pm sun behind him to act as a hair light, then used the reflector to bounce the sun and create the main light for his face. I placed him in the edge of a shadow created by a near by house to throw the background tone into a lower exposure value and let his face stand out against it but kept the foreground lit to keep the interesting shape of the weeds. And, my favorite part of a portrait, catch lights in the eyes. With the sun behind him the reflector is the only way short of a fill flash to get those eyes to sparkle.
Contrast that with the following with out the reflector.

While I still get a nice side light, but the catch lights are gone, his face is flat without any shadows, his face falls into the same exposure levels as the background and even if I bump the exposure a bit, the side light would probably clip and his face would still blend with the background.
I'm pretty convinced that a reflector is a 'must have' item for any portrait photog - they don't break the bank either, but if you're really cheap like I am you can use a Car Sunshade, I got mine at target for $5.99 and its even silver on one side and gold on the other - almost like it was designed to double as a photo reflector!